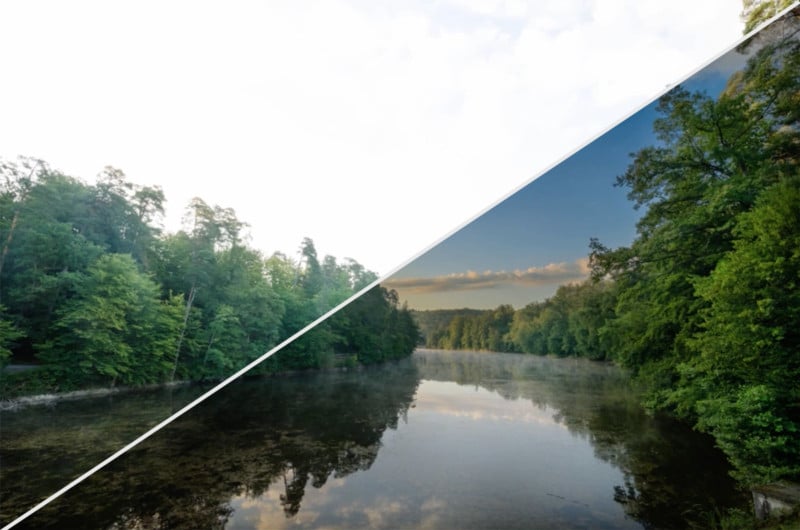
We’re all familiar with bad HDR by now, aren’t we? The kind of picture that makes your brain want to fight its way out of your head through your eyes. Aren’t we done with that, please? If you don't know what I'm talking about, look at the two pictures below.
One looks fine, the other. . . not so fine.
HDR processing with subtlety. © Kingsley Singleton
HDR processing with anything but subtlety. © Kingsley Singleton
Look, High Dynamic Range (HDR) imaging has been around for almost as long as digital cameras, and the reasons for its use are as old as photography itself. Put simply, HDR is a way of creating a picture that the camera itself couldn’t normally expose without losing detail in either the highlights or the shadows. It involves shooting multiple images at differing shutter speeds and combining them in software. It’s not an excuse for assaulting viewers with pictures that look like the crazed crayon daubs of satan.
To use HDR the right way, you’re just improving on what it’d be possible to create in a single exposure; just like using neutral density graduated filters. It’s a modern version of what photographers have been trying to do all along. So here’s how to do it better.
1. Don’t shoot HDR
End of article? No. It’s the start of a realisation; it’s the most important thing to grasp, so we’ve put it right up the front. HDR is not a style of photography – or at any rate it shouldn’t be – HDR is a technique. Just like using grads is a technique to control light is a technique, and just like using flash to add light is a technique. You wouldn’t go out specifically to use grads, and you wouldn’t go out specifically to use flash. So if you’re going out specifically to shoot HDR, you may as well stay at home and punch yourself in the groin.
HDR imaging is just a tool used to make a picture; it’s not the reason to make picture. So, if a scene demands you use HDR techniques to realise your vision of it, then do it. If it doesn’t, then you’re letting technique get in the way and the picture will suffer.
An HDR image, the technique being used to control wide contrast in the scene which, due to harsh lighting, couldn't be recorded in a single exposure. © Kingsley Singleton
2. Match the HDR method to the subject
If you’re thinking ‘what looks good in HDR?’, stop and go back a tip. Or just stop. Think of something else to do with your time.
Better is to think, ‘what subjects do I shoot that could benefit from an HDR approach?’ Because the type of subject you’re shooting will vary the type of HDR imaging you need to use, from capture through to processing. Landscape photography is not always suited to certain types of HDR processing; it can make scenes look over stylised or damn right ugly. If you need to apply HDR technique to landscapes it’s often better to hand-blend bracketed exposures or use only the most subtle of HDR tone-mapping effects.
But if you’re shooting urban landscapes, low light, or even some kinds of portraits, you can push things a bit and use your HDR tools more aggressively. These subjects will take it, even benefit from it, especially if you use tone-mapping methods that maximise detail and texture.
Some scenes suit HDR technique better than others. For instance mechanical and urban subjects often respond better than landscapes and other purely natural scenes. © Kingsley Singleton
3. Shoot manually
Your camera may have an HDR mode, but it will offer far less control than you get when shooting separately bracketed images and combining them in software. Modern cameras certainly give you a few options, usually controlling the intensity of the effect, but it’s no match for being in full control. If you want or need to produce finished images using HDR at the scene, try to use an option that lets you keep the original bracketed files. You can then revisit them and process them more discerningly later.
Most modern cameras have an HDR mode, but shoot separate exposures and use tone-mapping software or blend them by hand for the best results. © Kingsley Singleton
4. No tripod, no party?
Most HDR tutorials will tell you a tripod is vital. That’s simply not true. Yes, shooting your bracketed exposures from a locked-off position is sensible and likely to give the greatest quality in terms of sharpness, but there’s no need to miss out just because you don’t have your legs out. It’s only when your bracketing drops the shutter speed into unsafe territory for hand-holding that shooting this way isn’t a benefit. Try upping the ISO in those cases; a noise shot is better than a blurred one.
Set your bracketing up, switch on any image stabilisation you have, and shoot in the camera’s continuous drive mode. The faster the drive mode, the better. Then rattle off the shots you need – preferably more than once to increase chances of shots being sharp. Images for HDR shot handheld will need some alignment in software, but all good HDR processing software has that feature.
You can still shoot HDR in places where you can't use a tripod. Just switch to continuous drive mode and rely on your handholding technique to keep things steady.
5. Record everything
To truly control the dynamic range in a scene, you need to bracket wide enough to cover the whole range of light. You can work this out in a variety of ways, but it’s easier to simply bracket the hell out of it. If your camera can shoot a nine-frame sequence, use it. It’s better to take longer in shooting and possibly have files to throw away later than to miss out on precious detail.
If you’re limited to three or five shots in a bracket, cover the scene using the exposure compensation function, or manually. Shoot from, say -5EV to +5EV and you should be well covered, too.
HDR technique is all about recording the maximum amount of information and distilling it into a single frame. Use the widest braketing you can, and if options are limited, manually alter the exposure to cover the light levels in the scene. © Kingsley Singleton
6. Mix it up.
Once you understand that HDR is a technique, not a style, you’ll find it easier to mix it up with other techniques and photographic tools. For example, there’s nothing to stop you from using tools like focusing stacking or long exposures along with HDR technique to achieve the look you want. It just takes longer and is more exacting.
Similarly, try mixing HDR and regular interpretations of the same scene via layers in Photoshop, for instance using an HDR rendition of the subject or focal point while the rest of the scene is shot as usual.
HDR is just an imaging tool like any other; try combining it with other techniques like focus stacking to see what you can make. © Kingsley Singleton
. digitalrev.com2018-5-25 03:00